Nouvelles de l'industrie

How to install solar street lights?

Просмотры : 347
автор : Shenzhen Crown Lighting
Время обновления : 2021-07-01 15:44:33
How to install solar street lights?

 
Nowadays,
products of solar street light are more and more widely used in our lives. The reason for the rapid development is that the country has introduced many policies to support it to ensure that commercial LED street light develop more smoothly and exert a better use effect. So what are the installation steps of solar street lights?

I. Foundation pouring
1. Determine the position of the standing lamp; survey the geological conditions. If the ground surface is soft and soft soil at 1.2m, the excavation depth should be deepened; at the same time, confirm that there are no other facilities (such as cables, pipes, etc.) below the excavation position and the top of the
street lamp is not long time to shade the object, otherwise the position should be changed appropriately.
  
2. Reserve (excavate) a 1.3m pit that meets the standard at the position of the vertical lamp; perform positioning and pouring of the pre-embedded parts. The embedded part is placed in the center of the square pit, one end of the PVC threading pipe is placed in the middle of the embedded part, and the other end is placed in the storage area of ​​the battery (as shown in the figure above). Pay attention to keeping the embedded parts, the foundation and the original ground on the same level (or the top of the screw is on the same level as the original ground, depending on the site needs), and one side must be parallel to the road; this will ensure that the rear end of the light pole is upright. Not skewed. Then use C20 concrete to pour and fix it. Do not stop using the vibrator to vibrate during the pouring process to ensure the overall compactness and firmness.
  
3. After the construction is completed, clean up the residual sludge on the positioning plate in time, and clean the impurities on the bolts with waste oil.
  
4. During the concrete solidification process, water should be regularly watered for curing; the chandelier can only be installed after the concrete has completely solidified (generally more than 72 hours).
  

II. Solar cell module installation
  
1. Before connecting the positive and negative poles of the battery components to the controller, measures must be taken to avoid short-circuiting;
2, the solar cell module and the bracket should be firmly and reliably connected;
3. The output wire of the module should be avoided exposed and fastened with a cable tie;
4. The orientation of the battery pack should face due south, whichever is the direction of the compass.
 

III. Battery installation
  
1. When the battery is placed in the control box, it must be handled with care to prevent damage to the control box;
2. The connecting wires between the batteries must be bolted on the battery terminals and copper gaskets should be used to enhance conductivity;
3. After the output line is connected to the battery, it is forbidden to short-circuit under any circumstances to avoid damage to the battery;
4. When the battery output line is connected to the controller in the pole, it must pass through a PVC threading pipe;
5. After the above is completed, check the wiring of the controller to prevent short circuit. Close the door of the control box when it is normal.


IV. Lighting installation
1. Fix the components of each part: fix the solar panel on the solar panel bracket, fix the lamp head to the arm, then fix the bracket and the arm to the main pole, and pass the connecting wire to the control box (battery box).
  
2. Before lifting the light pole, first check whether the fasteners of each part are firm, whether the lamp holder is installed correctly, and whether the light source is working properly. Then check whether the simple debugging system is working properly; loosen the solar panel connection line on the controller, and the light source works; connect the solar panel connection line, and the light is off; at the same time, carefully observe the changes of the indicators on the controller; everything is normal, then Lifting installation.
  
3. When lifting the main light pole, pay attention to safety precautions; the screws are absolutely fastened. If the component's sun angle is deviated, the upward end needs to be adjusted and its sun direction is completely facing south.

4. Put the battery into the battery box, and connect the connecting wire to the controller according to the technical requirements; first connect the battery, then the load, and then the solar panel; pay attention to the wiring and the terminal marked on the controller during the wiring operation It cannot be connected wrongly, the positive and negative polarities cannot collide, and cannot be reversed; otherwise the controller will be damaged.

5. Check whether the system is working properly; loosen the solar panel connection line on the controller, the light is on; connect the solar panel connection line, and the
integrated street light is off; at the same time, carefully observe the changes of the indicators on the controller; everything is normal before it can be sealed control box.
Взаимосвязанные продукты
Светодиодные прожекторы серии ARF, внесены в список UL/cUL/DLC 5.1/TUV, 50–500 Вт, гарантия 5–10 лет, 100–480 В переменного тока, 140–160 лм/Вт
► Сертификация UL/cUL/FCC/CE/RoHS
► Дополнение 5.1 Премиум
► 0–10 В с регулируемой яркостью / датчик фотоэлемента (дополнительно)
► 500–500 Вт, 140–160 лм/Вт
► IP65, гарантия 5-10 лет
10W-60W SMD LED Down Light 110-150lm/w 5 лет гарантии 2700K-6500K 200-240VAC
► Без мерцания
► Доступен индивидуальный сервис
► Одна светодиодная лампа, четыре способа установки
► Уникальная форма CrowndaLED
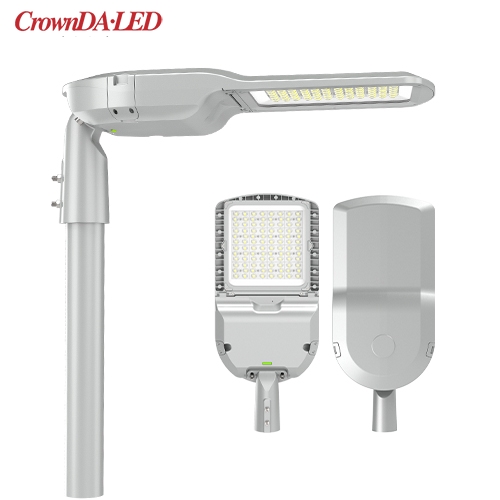
25W-320W FCC CE одобрил светодиодные уличные фонари серии S7 (B)
► Высокая эффективность: 130 лм/Вт, 150 лм/Вт и 170 лм/Вт.
► Антибликовый поликарбонатный объектив. Опциональный угол луча: 60°/90°/120°/T2M/T3M/T4M.
► 0–10 В с регулируемой яркостью / контроль времени / датчик освещенности / контроль лота
публикация